|
This page will include a labeled diagram of your animal's internal structures or anatomy. This diagram must be created on the computer. No hand drawn/labeled diagrams will be accepted. Helpful Hint: If you cannot find your animal's internal organs, search for an animal that is closely related to your animal. Reminder- Scientific diagrams always have:
You will use the same process used on page 4 to complete this page, with just a couple more steps. Here are step-by-step instructions to make it easier. Be patient and follow each direction carefully. Step 1: Google a picture of your animal. You may use the same picture you used on page 4 if you'd like. Step 2: Copy picture. Step 3. Open Microsoft Word Step 4: Write title and make sure it is centered (20-26 font) Step 5: Change font to 8-10. Step 6: Hit enter to go all the way down the page (this sounds like an odd direction but do it anyways). Add the sources and date to the bottom of the picture. Step 7: Go back up to the top and paste picture under the title. Step 8: Click on the picture and the little box next to picture and choose "Behind Text." Step 9: Click picture tools and select Crop Picture or Remove Background- When it looks like you want it to, click "Keep Changes". Step 10: You may want to rotate/turn and resize your animal to make it easier to place it on the left with room for labels on the right. Step 11: Google images of the internal anatomy of your animal. If nothing comes up, you’re going to look at page 3 of your research project to find the Class. Google images of the internal anatomy of the class your animal belongs to. Step 12: Copy the picture and paste it into Word. Step 13: Crop and remove the background. Step 14: Click wrap text and choose IN FRONT of text. Step 15: Move picture of internal organs so it fits on top of the picture of the animal and adjust the sizes, so the organs are about the right size for the picture. Step 11: Click Insert Shape (choose the line WITHOUT the arrow) Step 12: Hold the shift key to make the line straight. Step 13: Label the picture by adding a text box for each structure. Remove the black box around the text box by clicking on the edge and clicking Format Shape. Then, click "No Line" (You will probably need to find a website that will help you to include detailed labels.) Important: Label from the top down; this will make formatting much simpler. Step 14: Add source and date (In this case, the source is not your last name, it is the website you got the pictures came from.) Don't forget to add your sources to your Page 13 Reference Page! See the example below: 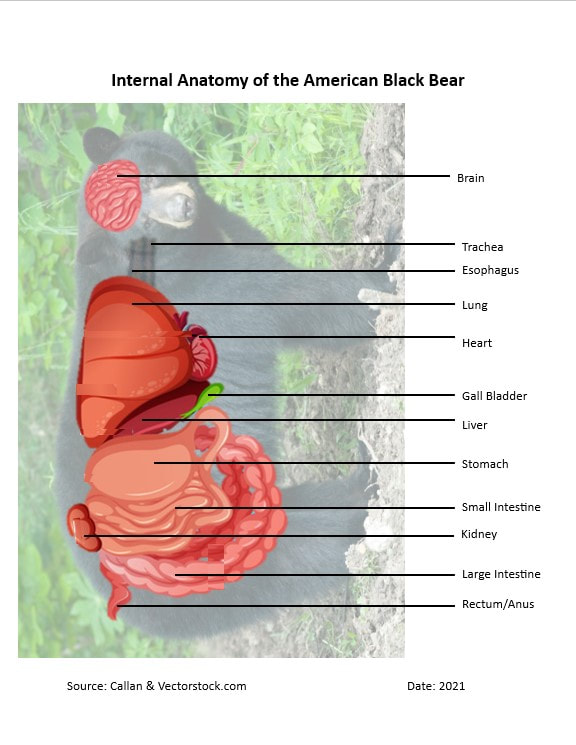
0 Comments
Your comment will be posted after it is approved.
Leave a Reply. |
AuthorWrite something about yourself. No need to be fancy, just an overview. Archives
March 2024
Categories |
 RSS Feed
